


Pumpkin drawing is fun for artists of all levels. Simple methods can make your pumpkin art unforgettable.
Learn basic shapes and shading to improve your skills. These tricks will help you draw great pumpkins.
We’ll show you easy steps for pumpkin art. You’ll pick the right tools and learn key methods.
Get ready to make your pumpkin drawings shine. You’ll turn blank pages into awesome autumn art.
Let’s learn how to draw cool pumpkins. Your creativity will bloom with these easy tricks.
Understanding the Basics of Pumpkin Drawing
Pumpkins are round with ridges from top to bottom. To draw pumpkins, start by drawing simple circles or ovals.
Choose the right tools for your pumpkin art. Pencils, charcoal, and markers work well for different styles.
Soft pencils help with shading. Hard pencils are great for clear outlines.
Pumpkin drawings can be realistic or cartoon-like. Some artists draw every detail, while others use simple lines.
Practice is key to getting better at drawing pumpkins. Start simple and add more details as you improve.
Look at real pumpkins to understand their shape and texture. This will help you draw them better.
Every pumpkin is special. Your unique style will show as you keep drawing.
Finding Inspiration for Your Drawings
Pumpkin drawing inspiration can boost your artistic skills. Nature sketching offers excellent starting points for authentic reference.
Visit a pumpkin patch or farmer’s market. Look at the shapes, textures, and colours of different pumpkins.
Digital art resources open up many possibilities. Pinterest and Instagram show amazing pumpkin artwork.
Skillshare and YouTube offer free pumpkin drawing lessons. These platforms teach various techniques.
Keep a sketchbook for pumpkin drawing ideas. Collect photos and make quick sketches.
Try different views of pumpkins. Visit farms, gardens, and fall festivals for inspiration.
Make a mood board with photos and colour samples. This helps develop your unique style.
Try watercolours, coloured pencils, and digital tools. These expand your artistic skills.
Your experiences shape your pumpkin art. Each drawing reflects your unique view.
Preparing Your Drawing Space
A good drawing space is key to artistic success. Your environment can boost your creativity and comfort.
Pick a quiet area with few distractions. This will help you focus on your pumpkin sketch.
Lighting is crucial for art. Natural daylight is best for drawing.
Set up near a window with soft, indirect light. Avoid harsh sunlight that creates strong shadows.
If natural light isn’t available, use a good desk lamp. Choose one with daylight-balanced bulbs for accurate colours.
Keep your art supplies organized. Use a storage caddy or drawer system for easy access.
Have pencils, erasers, and papers within reach. A tidy workspace helps maintain focus.
Think about comfort when setting up. Choose a chair with good back support.
Use a table or drawing board at the right height. A tilted surface can reduce strain while sketching.
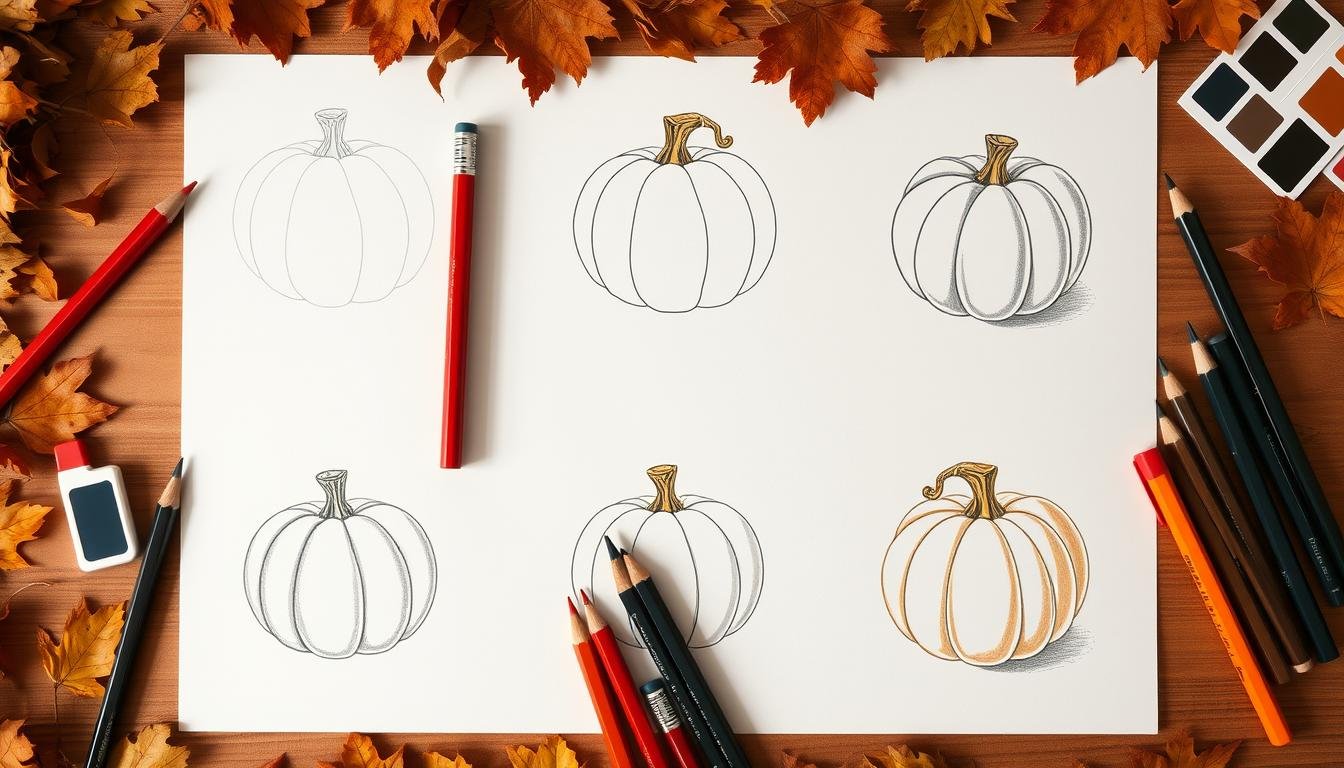
Step-by-Step Guide to Draw a Pumpkin
Let’s start drawing a pumpkin! First, make a light circle for the main shape. Use soft pencil strokes to get the right size and look.
Now, add texture to your pumpkin. Draw lines from top to bottom for the bumpy surface. Press harder in some spots to make the ridges stand out.
Shading brings your pumpkin to life. Use light, slanted lines to show its roundness. Focus on the bottom and sides where the shadows would be.
Blend the shading with your finger or a tool. This makes the pumpkin look more authentic.
Don’t forget the stem and base! Draw a rough stem on top. Add shadows under the pumpkin to make it look 3D.
Keep practising these steps. You’ll get better at drawing pumpkins in no time!
Tips for Drawing Realistic Pumpkins
Drawing lifelike pumpkins needs careful focus on details. Artists can make simple sketches look accurate with key methods.
Look at each pumpkin’s unique features. Colours can range from deep orange to soft yellows.
Light is essential in pumpkin drawings. See how shadows fall on the ridges and curves.
Use soft pencil strokes for natural textures. Add darker areas near the stem for a 3D effect.
Notice small bumps and lines on the pumpkin’s surface. Gentle shading can show these tiny details.
Try different drawing tools like coloured pencils or watercolours. Keep watching pumpkins closely to improve your skills.
Experimenting with Different Styles
Artists can boost creativity by trying various pumpkin drawing styles. Each approach offers a unique way to capture this autumn symbol.
Cartoon pumpkins are great for beginners. They allow artists to play with exaggerated features and fun expressions.
Artists can create charming pumpkin illustrations that spark the imagination. Simplifying shapes and focusing on character helps achieve this.
Abstract pumpkin art pushes creative limits. It invites artists to break down traditional pumpkin forms.
Unconventional colours, geometric shapes, and unexpected textures transform pumpkins into complex visual experiences.
Artists should mix different styles when drawing pumpkins. Combining realistic shading with cartoon-like shapes can yield interesting results.
Developing a personal artistic voice is key. It should reflect individual creativity and connection to the subject.
Each style offers unique ways to express yourself. Practice different techniques to find your preferred approach.
Common Mistakes to Avoid
Artists often make mistakes when drawing pumpkins. Understanding these errors can improve your sketching skills.
One error is ignoring proportions in art. Pumpkins have a rounded shape that needs careful observation.
Beginners often make pumpkins too symmetrical. Real pumpkins have subtle irregularities that give them character.
Shading and texture are often overlooked. Artists sometimes rush through the initial sketch.
Study the pumpkin’s unique ridges and curves. Careful observation helps capture the pumpkin’s proper form.
Perspective can be tricky for new artists. Drawing pumpkins from different angles is challenging.
Start with simple side views. Gradually try more complex angles.
Practice helps improve spatial awareness. It also enhances overall drawing techniques.
Use light pencil strokes during initial sketching. This allows for easier corrections.
Every mistake is a chance to learn. Use errors to refine your artistic skills.
Showcasing Your Artwork
Art presentation is key to highlighting your pumpkin drawing skills. Framing can turn a simple sketch into a professional piece.
Choose a frame that matches your artwork’s style and colour. White or neutral frames create a clean look for pumpkin drawings.
Consider matting your artwork to add depth and visual interest. This can make your drawing more appealing to viewers.
Social media is great for sharing your pumpkin drawings. Instagram and Pinterest are perfect platforms for this purpose.
Use natural light when taking photos of your artwork. This helps capture all the details accurately.
Try different angles and backgrounds to make your drawing pop. This can help your work stand out online.
Use hashtags and join drawing groups to connect with other artists. These can provide feedback and support for your work.
Take part in monthly drawing challenges to increase your visibility. This can help more people see your pumpkin art.
Digital portfolios are a great way to showcase your artwork. To build your online presence, create a website or use art-sharing platforms.
Organize your pumpkin drawings in an appealing online gallery. This can show how your art has improved over time.
Conclusion: Enhance Your Skills with Practice
Drawing pumpkins is an exciting art journey. Regular practice will help you improve your skills over time.
Set aside time each week to sketch pumpkins. Try different styles and techniques to expand your abilities.
Join drawing communities online or in your area. Share your art and get feedback from other artists.
These groups can inspire you and help you grow. You’ll learn new tricks from experienced artists.
Remember, mastering pumpkin drawing takes time and effort. Each sketch is a step forward in your progress.
Don’t worry about making mistakes. They’re chances to learn and get better.
Keep a sketchbook and watch tutorials to improve. Challenge yourself with new ways to draw pumpkins.
Have fun while you draw! Let your love for art guide you.
Be bold and try new things in your pumpkin artwork.
FAQ
What basic supplies do I need to start drawing pumpkins?
You’ll need quality drawing paper and graphite pencils. An eraser, coloured pencils, and markers help you add details.
A sketchbook and sharpener are great for practising pumpkin drawing skills. These tools will help you improve your artwork.
How can I improve my pumpkin drawing techniques?
Practice is key to improving your pumpkin drawing. Study the basic shape and break it down into simple forms.
Try different shading methods and styles. Watch online tutorials and join art groups for more tips.
What’s the best way to draw a realistic pumpkin?
To draw realistic pumpkins, focus on light, shadow, and unique textures. Start with a light sketch of the basic shape.
Add depth through careful shading. Use photos to capture subtle colour changes and ridges.
Can I learn to draw pumpkins if I’m a complete beginner?
Yes! Pumpkins are great for beginners due to their simple shape. Start with basic ovals or circles and practice often.
Break the drawing into manageable steps. Be patient as you learn and improve.
How do I add texture to my pumpkin drawing?
Use light pencil strokes to create ridges and bumps. Try different pressures and techniques like cross-hatching.
Pay attention to how light falls on the pumpkin. This will make your texture look more authentic.
What are some common mistakes to avoid when drawing pumpkins?
Don’t make pumpkins too symmetrical or perfect. Embrace their natural, irregular shapes.
Take time to observe each pumpkin’s unique features. Don’t rush the drawing process.
Can I draw pumpkins digitally?
Yes! Digital drawing is great for pumpkin art. Use tablets or software like Procreate or Adobe Photoshop.
Digital tools let you easily adjust layers, colours, and details suitable for new and experienced artists.
you may also read: Factors of 40: Discover the Divisors of This Versatile…


