


Drawing a realistic turkey can be fun and exciting. This guide will help you create a stunning turkey sketch.
Our tutorial explains the process in five easy steps. You’ll learn how to turn a blank page into a lifelike bird.
We’ll teach you professional techniques to bring your turkey to life. You’ll start with basic shapes and end with intricate details.
Get ready to explore bird illustration and unleash your creativity. Let’s begin this fantastic turkey drawing journey!
Introduction to Drawing a Turkey
Turkeys are fascinating subjects for wildlife artists. Their unique features make them an exciting challenge for turkey art enthusiasts.
Wild turkeys have intricate feather patterns and complex body structures. These birds offer remarkable details for wildlife drawing practitioners.
Artists see turkeys as compelling subjects that require careful observation. The bird’s muscular body and textured feathers provide opportunities to develop drawing techniques.
Through turkey illustration, aspiring artists can learn about proportion and accuracy. Observing turkeys in nature helps artists capture their true spirit.
Turkish art can unlock new creative potential for artists. It can expand your wildlife illustration skills, regardless of experience level.
Tools You’ll Need to Get Started
Choosing the right art supplies is key for a realistic turkey drawing. A good set of sketching tools can make your artwork come alive.
Get graphite pencils from hard (H) to soft (B) grades. Use a 2H pencil for light outlines and a 6B for deep shadows.
Mechanical pencils are great for precise details. They give consistent line weight in your drawings.
Pick smooth, heavyweight paper for your turkey sketch. It should handle many layers and erasing well.
Strathmore or Canson sketch pads are top choices. Get a soft-kneaded eraser and a precision eraser, too.
You might try blending stumps, charcoal pencils, and coloured tools. These can add depth and texture to your turkey drawing.
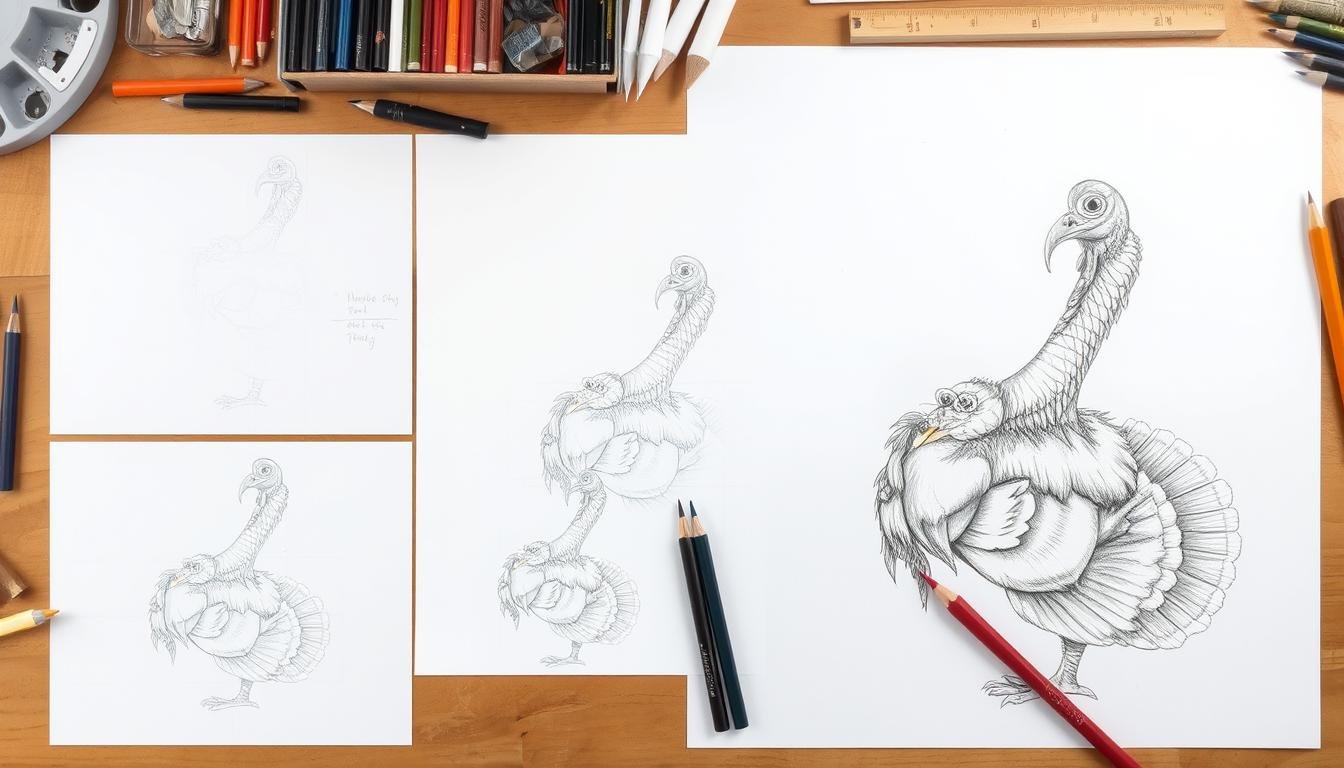
Step 1: Sketching the Basic Shapes
Let’s start by breaking down the turkey into simple shapes. This makes drawing complex animals much more effortless.
Begin with a large oval for the body. Add a smaller circle for the head.
Keep your lines light and loose. This allows for easy adjustments later on.
Focus on the turkey’s unique shape. Note its broad chest and small head.
Use curved lines to suggest the bird’s muscles. Practice capturing its stance before adding details.
Step 2: Adding Details to the Head
Drawing a turkey’s head needs careful focus on its bird features. Start with the curved neck and facial details.
Pay attention to the beak structure. It’s a key element that defines the turkey’s character.
Lightly sketch the head with soft pencil strokes. Study the curves and angles that make the shape unique.
Look at reference images for accurate beak structure. Wild and domestic turkeys have different beak shapes.
Capture the textured details around the neck and head. Wild turkeys have intricate skin patterns that change colour.
Use short, varied pencil strokes for depth and texture. Blend light and dark shading to bring out the bird’s features.
Draw the eyes with precision. They are key to bringing your turkey to life.
Add subtle highlights and shadows for depth. The eyes should look alert and expressive.
Keep practising to improve your skills. Each drawing helps you understand turkey anatomy better.
Step 3: Developing the Turkey’s Body
Creating a realistic turkey drawing needs careful attention to bird plumage. Start by mapping out the body’s basic shape and curves.
Focus on the wing structure. It’s key to capturing the turkey’s true essence.
Feather patterns bring your drawing to life. Sketch primary wing feathers with short, delicate strokes.
Use varied pressure to create texture. Darker shading near feather bases and lighter strokes towards tips help.
Study reference photos of wild turkeys. This helps us understand how light interacts with their feathers.
The tail fan is a distinctive feature. Sketch individual feathers with care, noting their shape and arrangement.
Use light and dark shading. This suggests subtle variations in colour and texture.
Patience is crucial when developing the turkey’s body. Take time with each detail.
Step back and assess your progress often. The most realistic drawings come from careful observation.
Step 4: Working on the Legs and Feet
Drawing turkey legs needs careful study of their unique anatomy. Turkeys have strong feet for walking and scratching.
Start by sketching the basic leg structure. Pay attention to the muscular thighs and scaled lower legs.
When drawing claws, focus on the sharp talons of turkey feet. These claws are thick and strong enough to grip the ground.
Practice drawing the scales and slight curves of each toe. Study the joint angles and proportions of turkey legs.
Use light pencil strokes to map out leg placement. Make sure they look natural and support the bird’s weight.
Use short, precise lines for the scaly leg texture. Notice how scales overlap to create a rough, protective covering.
Look at photos of live turkeys for accurate details. This will help you create a lifelike drawing of these birds.
Step 5: Finalizing Your Turkey Drawing
Shading brings your turkey drawing to life. It creates depth and dimension in your artwork.
Find the light source first. Then, build shadows to give your turkey realistic volume.
Texture is key in this step. Use soft pencil strokes to make feathers look real.
You can change your pencil pressure for different textures—light touches are used for soft areas, and firm strokes are used for defined parts.
Small details make your drawing exceptional. Add feather colour variations and eye gleam.
Blend shading carefully. This creates smooth transitions between different drawing areas.
Try different pencil grades. Soft 6B pencils make dark shadows, while hard 2H pencils work for light highlights.
Take your time with these final steps. Patience is key for a realistic turkey drawing.
Keep practising to improve your skills. Each drawing will make you better at shading and textures.
Common Mistakes to Avoid
Artists often face drawing errors when capturing turkey characteristics. Understanding these pitfalls can improve your art skills significantly.
One mistake is getting the turkey’s body shape wrong. Careful observation and light sketching can help maintain accurate proportions.
Another challenge is capturing feather texture and detail. Novice artists often draw flat, uniform feathers.
To fix this, practice varied feather strokes. Use different pencil pressures and techniques.
Don’t forget the turkey’s unique facial features. The wattle and snood give turkeys their authentic appearance.
Study these details carefully. Practice drawing them with precision.
Shading and depth are crucial for turkey drawings. Many artists use uniform shading techniques.
Learn to create subtle gradients and shadows. This brings your turkey illustration to life.
Recognize these mistakes to develop stronger drawing skills. Practice, patience, and observation are key to mastering your technique.
Tips for Improving Your Drawing Skills
Improving your art skills takes dedication and thoughtful planning. Observational drawing is key for artists to boost their abilities.
Study real turkeys in different poses to better understand their anatomy. Sketch them from life at zoos, farms, or wildlife centers.
If live turkeys aren’t available, use good photos for detailed studies. Focus on feathers, muscles, and natural poses.
Make a daily sketch routine to boost your skills. Start with quick 5-minute drawings of basic shapes.
Slowly add more details to body parts like heads and wings. Keep a sketchbook and try blind contour drawings.
Read animal anatomy books and go to art workshops. Use online resources to help you learn.
Don’t worry if it’s hard at first. Each drawing helps you get better.
You’ll learn more about turkeys and how to draw them. Keep practising, and you’ll see improvement.
Ways to Use Your Turkey Drawing
Your turkey drawing can be used for many fun seasonal crafts. Turn your artwork into unique decorations that show off your skills.
Make personalized cards, wall art, or custom placemats. These will impress your family and friends at holiday gatherings.
Use your turkey art for classroom decorations or scrapbooking projects—children’s art programs often like wildlife-themed crafts.
Frame your turkey drawings as seasonal artwork for your home. Thanksgiving wall displays with hand-drawn turkeys make great conversation starters.
Print digital versions on canvas, cards, or custom items. Mugs and throw pillows are fun options.
Craft fairs are great places to show off your seasonal art. Your turkey drawing could become a unique gift or item to sell.
Schools might like handmade seasonal artwork for their displays. Teachers can use turkey drawings to teach art techniques.
These projects can inspire young artists to improve their skills. Through wildlife illustration, they’ll learn to appreciate detailed observation.
Conclusion: Celebrate Your Art
Your turkey drawing is more than pencil marks. It’s a creative journey showing your unique artistic skills.
Art platforms like DeviantArt and Instagram showcase your artwork. They help you connect with other passionate artists.
Artist communities can transform your drawing experience. Creative networking opens doors to feedback and inspiration.
Platforms like Behance and ArtStation offer vibrant spaces. Artists share their work and techniques there.
Every drawing helps you master your craft. Each sketch builds confidence and refines your abilities.
Share your turkey drawing with friends or online groups. Embrace the joy of creating and keep practising.
Art offers continuous learning and personal growth. Keep exploring and enjoying your artistic path.
Your turkey drawing starts an exciting creative adventure. Keep drawing and see where it takes you!
FAQ
How long does it take to learn how to draw a realistic turkey?
Learning to draw a realistic turkey depends on your skill level. Beginners need 2-4 weeks of practice to develop a decent sketch.
With dedicated practice, you can improve your skills over time. Consistent drawing sessions will help you progress faster.
What are the most challenging parts of drawing a turkey?
The trickiest parts are the feather textures and body proportions. The head and wattle details also require careful attention.
Capturing the complex plumage and unique body structure of a turkey requires careful observation. Practice these areas to improve your turkey drawings.
Do I need expensive art supplies to draw a turkey?
You don’t need costly supplies to start drawing turkeys. Simple graphite pencils, an eraser, and drawing paper are enough for beginners.
As you get better, try advanced tools. But they’re not needed to create a good turkey drawing.
Can I learn to draw a turkey if I’m not naturally artistic?
Yes! Anyone can learn to draw with practice and guidance. Follow step-by-step instructions and study reference images to improve your skills.
Patience and regular practice are key to developing your artistic abilities. Don’t give up, keep trying!
Where can I find good reference images for turkey drawings?
You can find turkey images on wildlife photography websites and nature magazines. National Geographic and Audubon Society websites are excellent online sources.
Local farms and wildlife centres can provide real-life references. Nature documentaries also offer excellent visual examples of turkeys.
What drawing techniques work best for creating realistic turkey feathers?
Use layered shading and different pencil pressures for realistic turkey feathers. Pay attention to feather direction and texture.
Cross-hatching and stippling add depth to feathers. Focusing on light and shadow makes the feathers look more lifelike.
How can I improve my turkey drawing skills?
Practice often and study actual turkey anatomy to improve. Take drawing classes and sketch from life when possible.
Don’t fear mistakes. Ask for feedback and keep challenging yourself with more complicated drawings.
Are digital drawing tools good for learning to draw turkeys?
Digital tools can be great for drawing turkeys. They offer layers, undo options, and easy detail adjustments.
Start with traditional methods before trying digital tools. Basic drawing skills are essential in both methods.
you may also read: Pumpkin Drawing: Simple Techniques for Beginners


